Pages

Thursday, July 14, 2011

Open Faced Veggie Sandwiches

I posted this last year, but its buried back there quite a ways. I thought I would post it again. Now is the time that the gardens are over flowing and the baby goats are being weaned, so there's lots vegetables and milk to be had. Make some of the milk into cream cheese, use the cheese to make this recipe and enjoy!


Open Faced Veggie Sandwiches


16 oz cream cheese 

1 envelope Hidden Valley Ranch Dip seasoning

two pimento stuffed green olives chopped small

a handful of black olives (more or less as you want) chopped small

1 or 2 cloves of garlic chopped small

green bell peppers and onion chopped small - as more or  little as you want but more is better with the bell pepper

two carrots, shredded with a cheese grater

shredded zucchini - however much you want 


Use hands and mix it all together well. Spread on toasted rye bread (whole wheat works nicely too) and top with sliced cucumber and tomato. Serve with celery sticks on the side and enjoy!


Oat Bucket Farm Website

Pickled Beets and Jelly

We pulled quite a few beets from the garden. Wonderful, red yummies. I love pickled beets. Before they can be pickled though, they have to be par boiled. After we were done par boiling, we had several quarts of beet water or rather beet juice. A few cups had to be used in the pickling, but after that there was still quarts of it left. We really didn't want to waste it. I stood there and looked at the juice and thought, beets are tasty and kind of sweet...what about making jelly with it?


After some consideration, we decided this would be an excellent use to put the left over juice to. I jumped on the computer and looked up beet jelly, and sure enough, even though we had never heard of such a thing and beet jelly seemed like a new invention to us, someone else had already thought it. Not only had it already been thought of, but there were numerous recipes for it. I was thankful for the recipes. I would never have thought of putting a half a cup of lemon juice into it.


So armed with a recipe and the beet juice, we went to work. It turned out wonderful! A pretty red in the jar, it tastes absolutely fantastic! I am so happy we didn't have to pour away all of that juice. We had planned to use some in soups and stews and breads, but even with that there would have been too much. Now all of that extra is sitting in jars in the pantry. 


I can tell I will need to grow more beets next year. Not only are pickled beets a much loved food, but now beet jelly is a favorite and often requested jelly. My three year old was trying to eat some straight out of the jar with his hands.


A pint of beet jelly and a quart of pickled beets. The jelly looks so pretty with the sun shining through it.


From the other side. 


Beet Jelly:


4 cups beet juice
1/2 cup lemon juice
6cups sugar
1 box Sure Jell


You can either slice and cook six large beets until done in enough water to make 4 cups, or you can save the juice after par boiling beets for pickling. If you use the water left over from par boiling, save back a beet to cut up and toss in the water and boil until soft for richer color and flavor.


Boil plain water, pour into clean bowl and place lids and rings into the hot water and set aside.


Add lemon juice to the beet juice. Mix in Sure Jell and bring to a boil. Stir in sugar and stir constantly until it reaches a boil again. Continue stirring while it boils hard for 3 minutes. Ladle into clean jars (really? Do clean jars really need to be mentioned? Is there someone actually out there that would ladle it into dirty jars?) Fish lids and rings out of their bowl of hot water, place them on the jars (after making sure to wipe clean the rim and threads on the jar). Water bath them for 5 minutes. Remove from water bath and let cool.


Oat Bucket Farm Website

Tuesday, July 12, 2011

Chard Is So Pretty!

We have cut tons and tons of chard. It is holding up amazingly well in the awful heat we have been having. Its wonderful in salad, but there is no way we can eat that much salad fast enough to consume it all before it goes bad. So a bunch went into the freezer. We treat the leafy tops like spinach when we blanch and freeze it. The stalks we treat like broccoli when we blanch and freeze it. We eat the stalks like any other vegetable. The leaves we use like we would frozen spinach. It goes into dips, manicotti, enchiladas, etc. Usually right along with spinach.


A piled sink full, waiting to be washed.


So pretty!


Stalks waiting to be blanched.


More pretty leaves.


Leaves blanching


Blanched,cooled,and waiting to be bagged and frozen.


More pretty stalks.


Another beautiful leaf. They make really pretty additions to salads when fresh.


Oat Bucket Farm Website

Sunday, July 10, 2011

Graduation and Goodbye

I meant to post this a couple of weeks ago, but things got really hectic. Now that life has leveled out a bit and I have time to breathe, I can get back to blogging.


The graduation part of the title refers to the Jr chickens. They got big enough to graduate to the big chicken pen! They are very happy being able to run around and hunt down bugs. They are proper looking chickens now. They have all of their feathers and are just smaller versions of the older ladies.


And now for the goodbye. We buried Lucy, one of our flock matriarchs last night. She was seven years old and still laid an egg on occasion. She was my favorite hen. She came here as a day old chick and lived her entire life here. I don't know if it was old age that took her, or if she just couldn't take the constant triple digit temperatures. Either way, it was sad to find her departed from this world during evening chores. RIP Lucy, you will be missed old girl.


Oat Bucket Farm Website

Saturday, June 11, 2011

First Cheese

We made our first attempt at cheese and it turned out wonderful! Now granted, it was a simple soft cheese but we didn't want to do anything to complicated for our first foray into the world of fresh, home-made, goat cheese.


We used one gallon of whole, fresh, raw, goat milk. We heated it to 190 degrees F. Once it reached that temp, we removed it from the heat, added a half a cup of white vinegar and mixed it well. Then we covered it and let it sit. When it had cooled to 100 degrees, we lined a colander with a white pillow case ( if you do this, make sure its one that has no fabric softener on it) and ladled it into the pillow case. Do not pour it, it will splash everywhere. 

Once you have it all in the pillow case, pick up the pillow case and work it all into one corner and squeeze. Then hang the pillow case (we hung it in the shower) for one and half to two hours - longer if you want drier cheese. 


This cheese is extremely mild. We seasoned it with garlic,onion,paprika,parsley, basil, salt and pepper. The we shredded up a bunch of crab in it. We used imitation crab because, quite frankly, real crab is too expensive for this little hobby-homestead. 

This herb crab cheese is beyond delicious on crackers.  

Tuesday, June 7, 2011

Cheesecake Swirl Brownies with Caramel Sauce

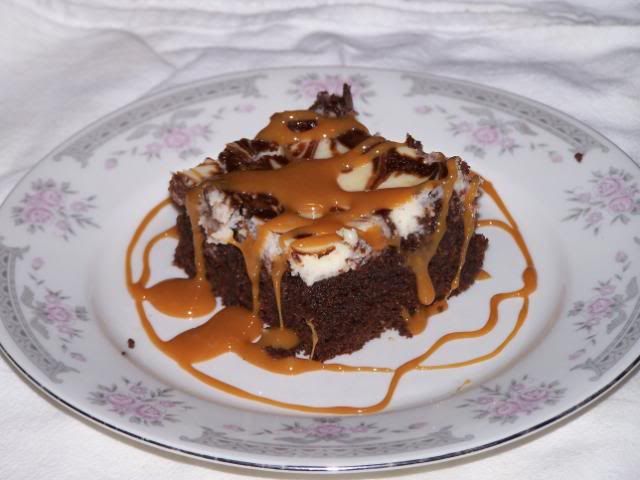
Here are the recipes for anyone wanting to gain about ten pounds. I got the Cajeta (caramel sauce) recipe off the goat forum at Homesteading Today, however I don't remember exactly who posted it, so I don't know who to credit with this delicious, smooth,creamy, wonderfulest (it is to a word) caramel recipe in the world.
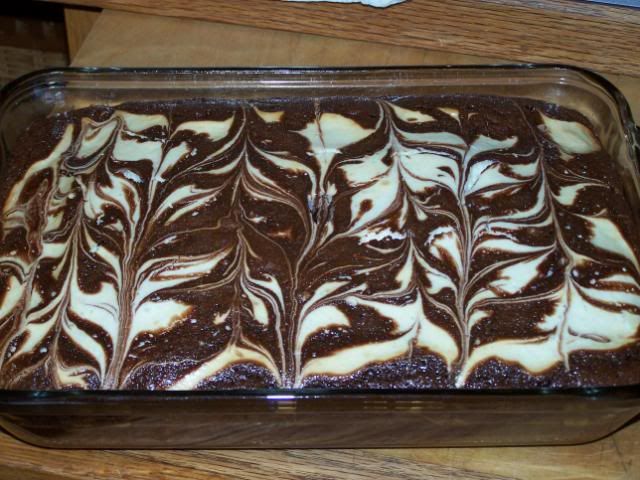

Brownies:

1 cup of butter
2 cup of sugar
2 teaspoons vanilla
4 eggs
1 cup flour
2/3 cup cocoa
1/4 teaspoon baking powder
1/4 teaspoon baking soda
1/2 teaspoon salt

Melt butter. Mix flour,cocoa,baking powder,baking soda,and salt. In separate bowl, mix sugar,vanilla,and butter. Add eggs. Slowly add flour mixture. Grease pan. Pour in most of the batter, with holding just a little (maybe a cup)

Cheesecake:

8 ounces cream cheese
1/2 cup powdered sugar
1 egg white
1/2 teaspoon vanilla

Beat cream cheese and powdered sugar together for 3 minutes. Add egg white and vanilla and beat for an additional 2 minutes.

Pour cream cheese mixture over brownie batter, trying to cover as much of the brownie surface as possible. Pour with held brownie batter over that, drizzling it around. Take a butter knife and drag through the cream cheese and brownie batter. You don't need to go real deep. Go lengthwise, then crosswise.

Bake at 350* until a knife inserted into the middle comes out clean, there maybe a small amount of cheesecake clinging to the knife even when its done.

Cajeta:

In large pan put in 2 qts milk,2 cups sugar,and 1 teaspoon vanilla. Bring to a boil. When it reaches a boil, remove from heat. Dissolve 1/2 teaspoon baking soda in 1 tablespoon water and add to milk mixture. It will bubble up quite a bit.

Let rest about 10 minutes or until bubbles are gone. When bubbles have subsided, return to heat and bring to a brisk simmer/low boil. Stir very frequently. When the mixture turns pale golden, begin stirring even more often. Once it starts to thicken more, you will need to stir pretty constant. It needs to be simmering even while stirring. It will reduce and become a rich caramel color and become a medium thick sauce. You can put a couple of drops into cold water, if a soft ball forms, it is ready. About 240* on a candy thermometer. If its too thin, return to heat. If its too thick, add hot water ny the tablespoon until it is the proper thickness.


Oat Bucket Farm Website

Monday, June 6, 2011

Oh Yum, Cajeta!

We made Cajeta for the first time today. Cajeta is a Mexican caramel sauce, made from goat milk and oh my, it is so wonderfully yummy! It was easier to make than we expected. Next we are going to tackle cheese. Now, the caramel sauce is fattening enough, but we couldn't leave it at that. Oh no. We had to put it over cheesecake swirl brownies.


Oat Bucket Farm Website